
Intro :
This is a speaker project i did in parallel with the T-Amp. As all the best projects, in the beginning, it was never meant to be...
I was surfing the full range speaker section @ diyAudio.com in search for a project to go with the modded T-Amp i was doing (see my other entry here). I kinda decided from the beginning that i wanted to go with a single driver design, but couldn't find "the ideal project".
There were some very nice designs around that i was interested in, but the budget was an issue ; indeed, i couldn't justify to myself to pay 200+ euros for a pair of drivers, not for the first speakers i was going to do. I ended up posting my question on the forum, and got a lot of helpful replys (the folks over there are very nice). I even decided on the project i wanted to do in the end : the Cyburg's Needles, with VISATON FRS8 drivers instead of the original TangBand ones. Everything was fine in the universe. Back then.
This all was before i saw some photos of the Cornu Spiral Horns...
Now, i'm a sucker for beauty. Really. To the point of being able to put aside rational thinking when a mirage of magnificence presents itself before me. To the point of forgetting all the "reasonable", "practical" arguments that go against that beauty. To the point of being possessed, obsessed even, by that beauty. To be able to convince myself that the obtention of that beauty could be within my reach, if only i try hard enough. No matter if i have no idea how, nor the skills needed.
And that's exactly what happened here. Daniel, i blame you for all this ;)
Boy, once i saw the Cornu Spiral Horns, i knew i was in trouble...
Exit Cyburg's Needles, exit all rational thought, i had no idea how to get there, but i knew i wanted to build a pair of Cornu Spiral clones. In a way, i was in love. To each their own.
 I surfed around, trying to find more information about them. I was sure that there had to be clones built already, i just couldn't be the only one in my condition ?
Surprisingly enough, the information was sparse. No fully documented DIY project. But a few projects nevertheless (see below for links).
None in "two layer" design, all "simple layer" (two squares with the spirals rolled inside). None in all-wood. Hmm. I found it strange.
What's more, the design seemed to work, even with the modified simpler projects.
That's when i decided i wanted to go all the way, two layers, all-wood, the works. So i tried to track down every bit of information available on the net. I found out in a comment @ the Cornu site, that for budget drivers the MONACOR SP-50X will work. That's even better. I downloaded the photos, the drawings, made plans, took notes. It started to shape up. At times i wondered how in heaven i was going to be able to pull this off, but i knew i just had to try. And that's how it all began...
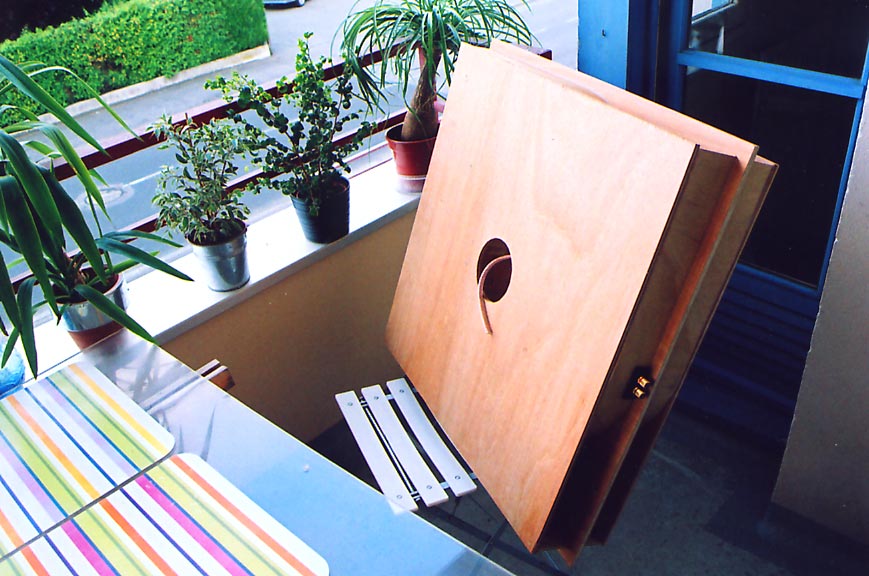
...and just below you can see a photo of how it came to an end.
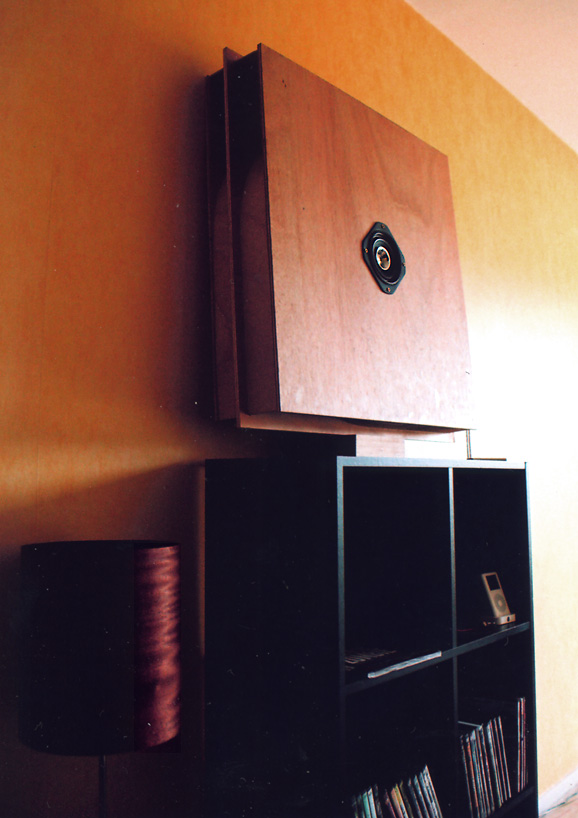 |
| One of the finished Cornu's |
Cornu DIY what? :
Before i start, i might add that all this information is available on the net. Well buried, certainly, but freely available.
What i couldn't find, i had to invent by myself. I think that the right idea is there, but have no idea of how dependent the design is of the details (although i'm sure they are important, the details are always the most important thing), the exact curves, the millimeter stuff and such.
I have never had the chance to listen to the real deal, the genuine Cornu's. But, once again, i think that the right idea is there.
Therefore, i wouldn't dare call this a Cornu clone, but rather a tribute to Cornu. A copy, if you will. Hence "Cornu Spiral Copy Horn"...
Some links to the few rare DIY projects i found about :
- Poiram's Cornu project : http://www.freewebs.com/ulzog/poiramsspiralhorns.htm
- micro-io project : http://www.micro-io.dk/speaker.htm
Wow. Two? Well that's all i could find.
Here's the Official Site : http://www.cornu.de/en/minispir.html
EDIT 12/2012: diyAudio has a thread going on, on building Cornu's in foam core board. If you wish to give them an almost-no-cost-and-bulid-them-quickly try-out then this should allow that.
The Specs :
Reportedly, the best drivers that’ll work for Cornu, are = FOSTEX FE108EZ (the most expensive), Lowther DX4 (middle-prized), and the MONACOR SP-50X (the cheapest). Alternatively, i found this info in a post from Daniel (the creator of the Cornu) on his message board :
"The first step in the upgrade path is to replace the SP50X drive unit with Lowther, AER, REPS, Fertin or whatever fullrange driver you prefer. It should have fs=36Hz and Qt=0.25 or values close to that."
So pick a driver that suits your taste & budget, my choice was based on economics. I'll upgrade them one of these days. The rest of the specs (in my project) are :
Top & bottom plates (the "cover" and the "back") = 70cm x 70cm x 10mm
Middle plate (where the cuts are made) = 74cm x 74cm x 10mm
The flow guides :
- lower-left & upper right (longer) = 224,5cm x 14cm x 3mm
- upper-left & lower right (shorter) = 159cm x 14cm x 3mm
The cover plate has a central opening (read : a hole) for mounting the speaker --> 11,5cm for the MONACOR SP-50X.
So, in my project, this and the rest necessary gave me a total of :
- 4 square boards of 70cm x 70cm x 10mm
- 2 square boards of 74cm x 74cm x 10mm
- 4 flow quides of 224,5cm x 14cm x 3mm
- 4 flow guides of 159 x 14cm x 3mm
- 2 Monacor SP-50X full range drivers
- 2 speaker terminals
- 4 meters of speaker cable
- glue
- wood lacquer
 |
| The middle plate |
So why the middle plate is 4 cm bigger than the cover & bottom ?
For the cuts for the flow guides that'll go flush with the two other plates. I started out by imagining only 2 cm more (72 x 72 cm), but in the end decided to go with 4 cm. It's a whole lot easier to work with the cuts when you have 2 cm of secured space from the borders. Also, i find that the aesthetics call for this as well. Today i wouldn't imagine them otherwise...
I wouldn't recommend cutting the flow guides length-wise before doing the middle plates, as the exact length can change a few cm, depending on the cuts made in the middle plates. I prepared mine in straight cuts of 14cm wide, and then, in the end, cut them in length as i needed.
Imitating beauty :
Ok, so i had my square plates cut (all 6 of them), it was time to do some drawing. For the two cover plates, it couldn't be simpler : locate the center, and draw a circle with a diameter of 11,5 cm. This applies to Monacor SP-50X. You'll need to change it of course if different drivers are used. This was going to house the drivers. As for the middle plates...well, this is where the fun part begins. Kind of.
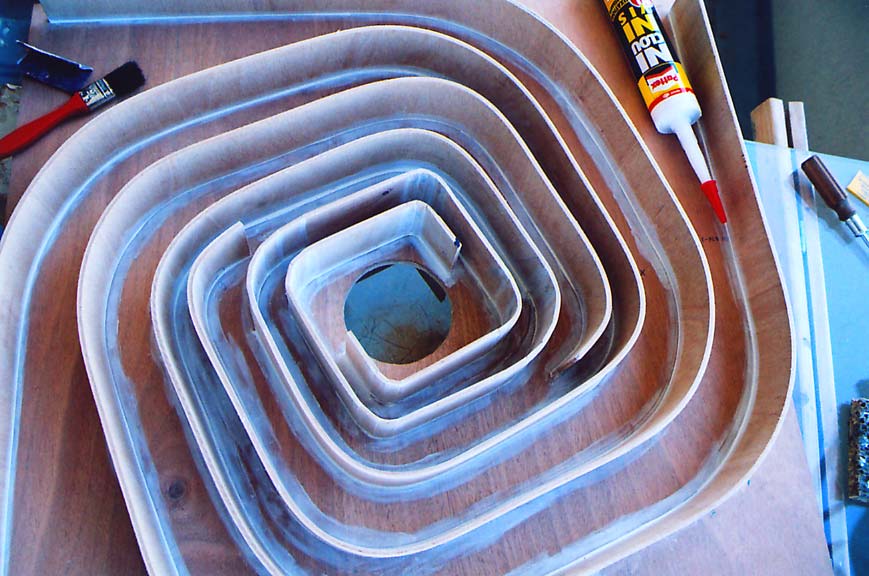
I had prepared a mock in cardboard on which i had drawn and cut the following schema, a reproduction from the photos seen of the entrails of the Cornu. Click on it to get a bigger one :
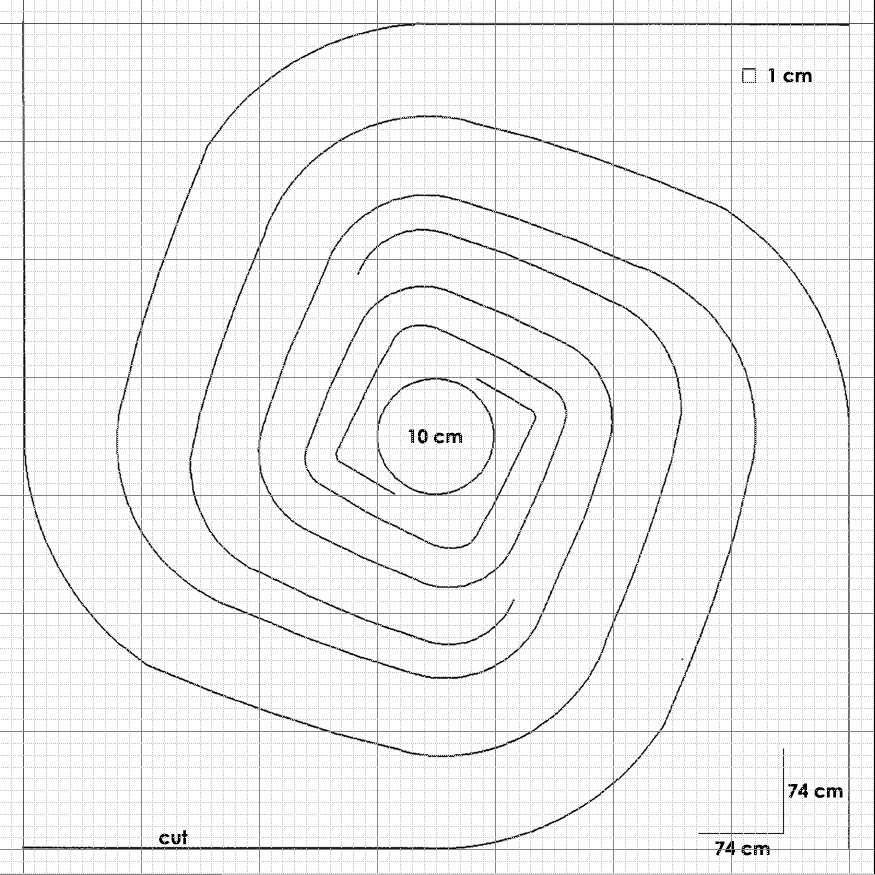 |
| The flow-guide schema. |
My idea was to reproduce the drawing on placing the mock plate on top of the wooden one, and trace with a pencil within the cuts. I'll save you the trouble by saying it didn't work. The cardboard loses all the rigidity once all the cuts are made, and thus can not be trusted when tracing, it moves in every direction. Needless to say the results were *very* approximate. I had no choice : i reproduced the grid from the schema on the wooden plate, and traced the flow guides, like when i was a kid and had to rescale a drawing. It takes time and is rather tedious, but i kept telling myself it was all for the best possible result. And it did give a perfect result. Some more patience, and an identical procedure on the second plate. It was well worth the effort.
There, all the plates were drawn. Now i just needed to cut them.
"Just" ? Man, that was a lot of work. It was indeed so much work that i remember telling myself that had i known the amount of work necessary, i'm not sure i would've picked it up as my first project. There's a lot of trails to be cut, i can tell you that. More than 15 meters, to be exact. And i did some of them more than once also. Why? Because i didn't cut them wide enough from the beginning. Imagine that they have to be *at least* the double the thickness of the flow guides. In my case the guides were 3 mm thick, so at least 6 mm for the cuts, then. Count more for the bends. The wood stresses and gives an outward pression when bent. This means that if the cuts are individually exactly what is needed, when you insert the first guide and mount further towards the center of the spiral, each turn adds more pression, and since the plate now ressembles a swiss cheece (with all the trails), this pression is distributed everywhere on it. Clearly put : what was an exact fit before, is nearly closed for access now.
Here's a happy end result:
 |
| A puzzle game |
In practice, i'd guess i cut them finally to about 1 cm wide everywhere. This gave me the freedom to mount "rather easily" the flow guides, but raised another problem : i had to fill those gaps later on, and larger they are...well, you get the picture. If i did it today, i'd go somewhere between, say, 6-8 mm.
So i cut the trails. Did i mention that it was *a lot of work* ?
 When all the trails were made, it was time to do some measuring and cut the flow guides into correct lengths. They did measure up to what i indicated in the specs. The shorter ones were a no-brainer ; they bent from start to finish in one piece. The longer ones however, i knew i had to do the center of the spirals in bits & pieces.
So i did the following :
i cut the shorter flow guides first, then mounted them. This allowed for an easier way to work on the longer ones. I cut the starting pieces roughly the same length than the two shorter guides, then mounted them.
This left me with the center of the spiral. I simply went and cut whatever was needed in length for the tight bends and lines. Piece by piece. And cut a small bias on each piece, so as to fit it perfectly with the one before, and so on...
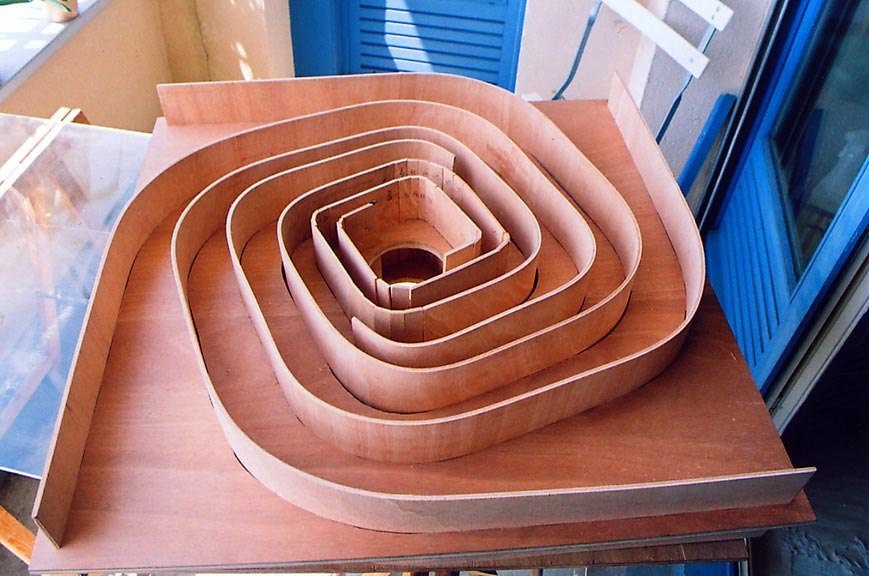
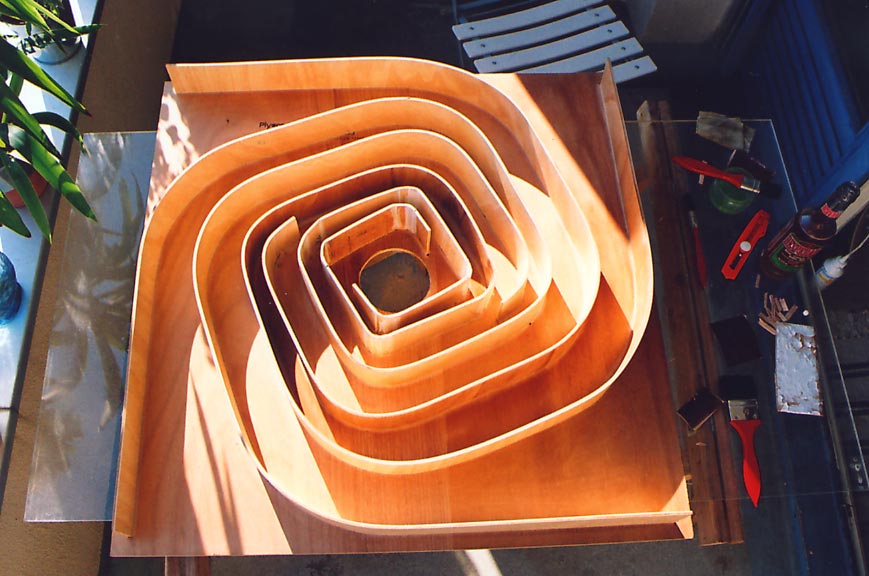
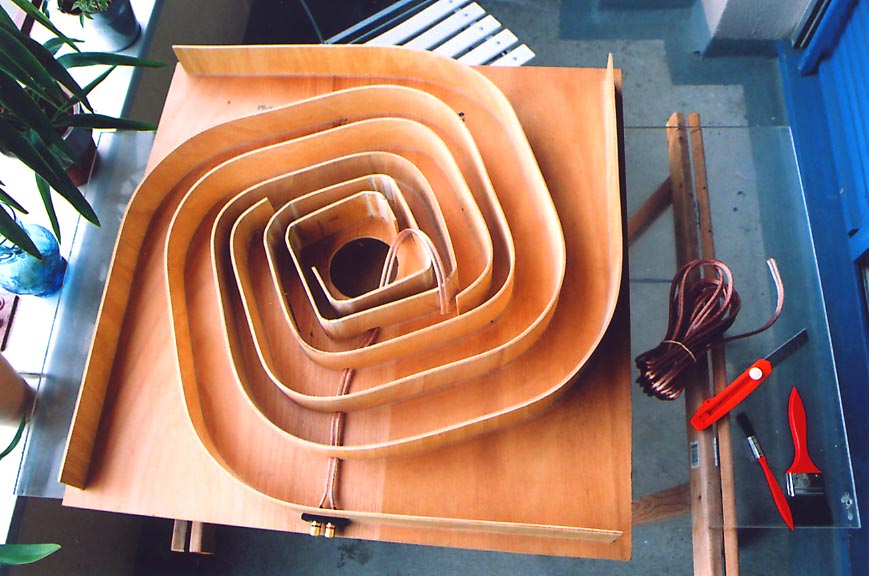
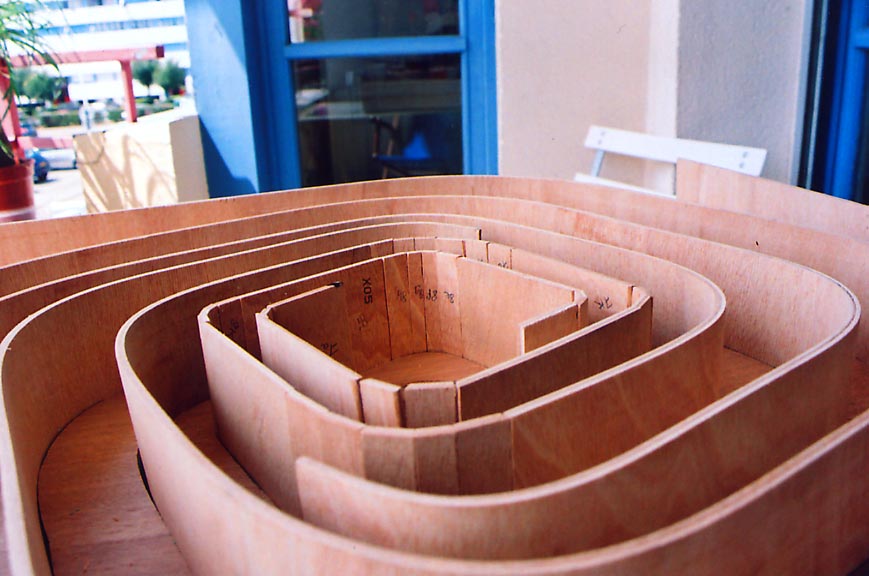 Here are some photos with everything "dry-mounted" for testing. You'll notice on some of them that all the pieces are numbered. I did that from the beginning so as to not lose the track of things, as i was going to glue them in two sessions. Click on the photos for bigger ones.
Once all the pieces of the spiral puzzle were cut & prepared, it was time to glue ! Glue dude glue ! But just before that, i had to make sure that the plate was *exactly* in the middle of the flow guides. The advanced hi-tech method used was a plastic meter and loads of time ; and around we go, again and again. Pushing and pulling.
I removed the bits & pieces from the center, and glued only the four long flow guides. This is better done on a plane surface, as it helps to make sure the guides are leveled. That way the cover and the bottom should fit with no problem. I filled the bigger gaps in the trails with left-over wood, and applied a generous coating of glue on the base of the guides. Wait and let dry. Once dry, turn over and start again. Wait and let dry.
 The rest (the center) was glued piece by piece, on my sunny balcony and with a bottle of cold beer always available (i rather found that the tequila-flavored Desperados© did the job perfectly). Once everything was dry, i filled all the cracks and holes that were left, and sanded the whole lot. Dude, did i mention already that that was all some huge amount of work. At that moment i remember thinking that had i knew how much work it required, i would have probably not chosen to do it as my first project.
Once everything was nice and smooth, i lacquered everything. Two layers, yes sir. A lot of lacquer it took. The thing with the Cornu's is that they just look like a square plate of 70x70 cm, when in reality there is an enormous surface of wood, everything counted. Let's see : there's 15 meters of flow guides. 2 sides. That makes it 30 meters. Add almost 8 square meters with the plates (with the two sides). Apply two layers. You can feel the glue and lacquer running...
You can see a nice colour taking on after two layers:
So a lot of lacquer later, i prepared the cables from the center to the edge. Making the holes through all the flow guides once they were in place was not an easy task, but i fail to imagine how it could be done otherwise.
It all needs to be glued before making holes, otherwise who knows where the holes will end up to...
EDIT: i had an exchange with Daniel via email after i had finished the project, and he said he used flat cables that ran against the back wall. That would've been indeed easier, in retrospective. Oh well, for the next time...
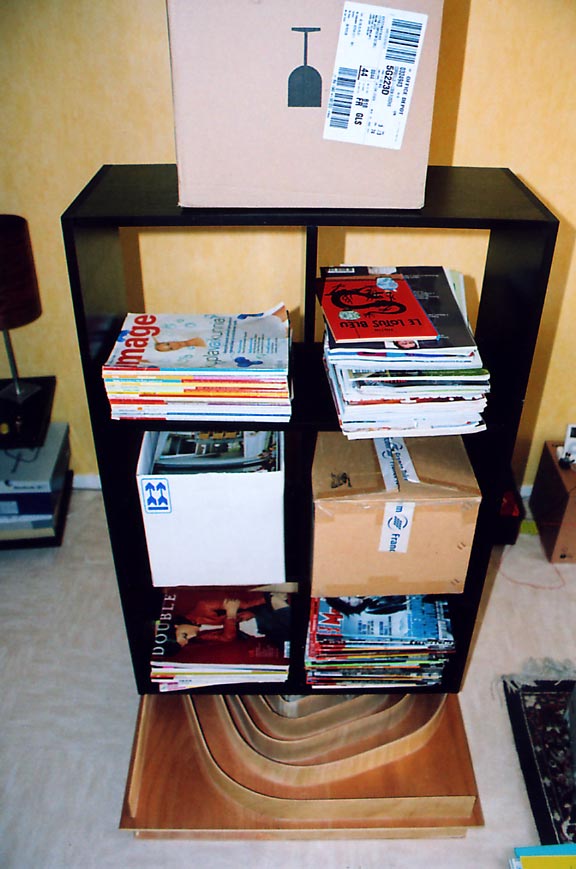 |
| Choose heavy reading for more weight |
On the downside, it all started to get heavy already, and to handle it carefully upside-down while placing it flush from each side proved to be somewhat...delicate. You don't have much time before the glue starts to take, but aside a few details, it worked out very nice. Once dry, turn around and repeat.
And then, the last morning, after yet another night under my bookshelf, there it was : this object of my desire that i had learned to accept as something that would never be finished (in a way it had almost been reassuring in the same way that it had been frustrating). But now, there it was, slightly coloured and reflecting the increasing daylight that filled the room. The last of them two.
It...was...finished.
 |
| Last moment before fitting the Monacor's. |
It's Alive !
So how do they sound ? Well, my first reaction was that of sheer amazement at the amount of bass they produced. And i mean *a lot*. So much so, that i felt it ate the middle frequency. Some low stuff indeed.
Then i realized that their placement is something of critical. No chance to leave them on the floor. So i elevated them. Muchos better. But they are some heavy beasts, and i haven't yet had the time to fix a secured system for them to hang from, so for the moment they are on some stuff. But elevated. Also, i'm using a modded T-Amp to drive them (see my other post), which means some new big capacitors that'll need some time to settle down. All in all, the sound is starting to change already (after some 20 hours of listening), and the bass is becoming more controlled.
The mids are still lacking in some type of music, but there are others where everything is *spot on*. Mainly electronic. And when it's perfect, it's heaven for my ears. The overall sound changes as soon as i move one or the other speaker more than 1 meter, so i'll have to experiment. Then there are the drivers that i'll change one day. All this leaves a lot to wait for, but in general, i'm enchanted. And the sheer beauty of them leaves me contemplating each time i look at their direction.
This is definitively a project that i would have *never* started had i know the amount of work involved, but today, i am so glad i didn't have a clue about it.
Bottom line : i love them.
Merci DIY :)
Moi Seb!
ReplyDeleteIhan mieletön toi sun projekti. Kaunis ulkomuodoltaan ja varmaan kuulostaa hienolta.Aloin jo itsekin innostua, kun kaikki on aina niin tylsän näköisiä. Saisi juuri sellaisen kun haluaa.Mulla on jo johtoakin.Mietin mitä matskua toi taivutettu osa oli ja millä teit uran sille.Hieno tarina myös. Onnittelut!!!!!
Hello,
ReplyDeleteI Would like to build cornu horns but I don't understand all the technics used to make them. I would like to know if the spirals are crossing the center panel and if the 10cm hole is on the center panel or if it's the speaker hole.
the 4 horns are separated by the center panel so in reality there are 8 horn no?
Your answer sould realy help me.
If you have some advise from your experience of the building of your cornu horns I'm ready to follow them.
thank you !!
(sorry for my poor english because I'm french. so if you don't understand something i can try to explain better.)
Hi Zen,
ReplyDeleteyou have understood it perfectly ; the spirals "cross" (go through) the center panel, and the 10cm opening is for it as well (the front panel hole size depends of your chosen driver)...
Unfortunately i didn't have my digital camera when i did them, so you'll have to rely on the only photos that are here. You can see clearly that the spirals go through the middle plate on the last two photos.
And yes, it makes for 8 horns per speaker in the end, in fact.
Good luck on your project.
P.S : Ton anglais est très bien, et je crois que pour le bénéfice de tous ceux qui pourraient passer par ici, nous devrions la garder comme la langue "officielle" (ou au moins offrir une traduction chaque fois), mais si t'as des questions plus compliquées, je les comprendrais en français aussi (je vis en France même si pas francophone de naissance)...
Allez, bonne chance ;)
Very well done!!! I too am very attracted to the elegance and simple beauty of the Cornu design.
ReplyDeleteLike you I have been googling like made but have turned up very little. Did you ever come across any empirical information that relates dimensions to Thiele/Small parameters? I want to try some very nice 8 inch drivers that I have but I'm not sure how large the chamber behind the driver should be or how to calculate the throat size at the beginning of the horn.
I hear your comment about how much work was involved but usually anything really worth having involves some amount of sacrifice.
Thanks
Ken (Canada)
Hi and thanks,
ReplyDeleteI used your jpg and I am now about to glue my second horn. Tested the first of the pair and I agree they produce alot a bass especially compared to the small 10,5 litre br box I used before. I used fostex fe126e as the driver for this horn and it seams to woork well.
/Joachim
Is there any protection for the bass? Because a xmax of the Fostex FE108EZ driver. It is only 0.28mm and isn't too much! What about that xmax it seem FE108EZ is for the only high frequences...
ReplyDeleteThis comment has been removed by the author.
ReplyDeleteYou can draw the spiral then, instead of cut the cardboard, pierce the line with a needle...you know, making a lot of holes...
ReplyDeleteSo you can then put the cardboard on the whood and redraw the same lines with a thick marker, that passes through the holes you made...
Michelangelo told me ;)
Hi,
ReplyDeleteI'm considering to build a cornu.
But after reading and searching I don't understand if the middle panel is cut for the spirales and if it is I suppose (it's look like) it's centered between the front and the back panel ?
best regards
Fred
Hi Fred, the middle panel is cut for the horn spiral, and is centered between front and back panels (in the last 2 photos you can see it's the one in the middle). You cut in the panel as indicated in the drawn schema, and bend the horn in it, center it in the middle and glue the horn in place. Then you glue the top and the bottom panels at each side. So, in the end you have: the top panel with the speaker opening, the middle panel centered with the spiral horn, and the bottom panel closing it. Hope that helps. Sebastian.
ReplyDeleteHi Sebastian, thank you for your post. I'm considering making these as well. It seems that the difficult part is the flow guides.
ReplyDeleteI'm considering making negative and positive forms from MDF with a 5-6mm gap between them, in the shape of the flow guide. Then I'll rip some thin 130mm x 1-2mm wood. I'll then clamp 3 layers of these 2mm strips between the negative and positive.
Perhaps you tried this technique already?
Best regards
This comment has been removed by the author.
ReplyDeleteHi Sebastian, this blog was my inspiration to build my own pair of spirals! We'll 10ish years later they are complete. My journey is here https://muzzargh.blogspot.com/?view=classic&m=1
ReplyDeleteI too have heaps of bass but I'm sure it will settle over time.
Thanks for posting.